
This is the second part of the “Populating the Dyson Mega-Delve” series. In each session, I’m taking Dyson Logos’ Mega-Delve and filling it with my own monsters, traps, and diversions.
Here’s what this edition covers:
- A recap of The Dwarven Outpost encounters.
- Introduction to Dyson Logos’ Mega-Delve map: the Hematite Mines
- What we learned from Dyson’s description.
- How I interpreted the information (plus a new monster).
- Area descriptions for the Hematite Mines map.
To see and download the Dyson Mega-Delve yourself, check it out here: The Dyson Mega-Delve.
The Dwarven Outpost’s Results
Already, the Dyson Mega-Delve has been incredibly exciting to run. The PC’s started the last session in the large mud pit room (area #8) of the Dwarven Outpost. Almost immediately, they drew the attention of the kruthik from the neighboring hematite mines with a fireball. They managed to get past the reptilian beasts without a fight the first time. Later, after a long rest in Leomund’s Tiny Hut in the center of the mud pit, they woke to find themselves surrounded by nightmare stalkers. Forgetting about the warnings the duergar gave them against using fire, they used another fireball. The second time they weren’t so lucky.
Lokkar the barbarian, companion of the party since nearly the beginning died protecting his comrades. It was the party’s first death in twenty sessions of play. Sad stuff.
Of course, the PC’s looted the shit out of his body and went about their way.
Unable to climb up the sinkhole to the rooms below the mushroom cavern, they decided to head west into the Hematite Mines in hope of finding a way back east.
Little did they know that they were heading straight into the den of the kruthik.
Some changes I made to the Dwarven Outpost
While playing, there were a couple things I thought would be cooler changing my notes. Those things were:
- Instead of duergar guarding the way into the outpost, I placed an ogre battering ram (Mordenkainen’s Tome of Foes, p220) named Bucket there.
- I reread the entry for steeder, and realized that the steeders wouldn’t make sense in the steeder caves since the female steeders don’t like having males around after gettin-jiggy-time. While my players never went into those caves, I still would’ve substituted giant spiders and covered the whole place in webs.
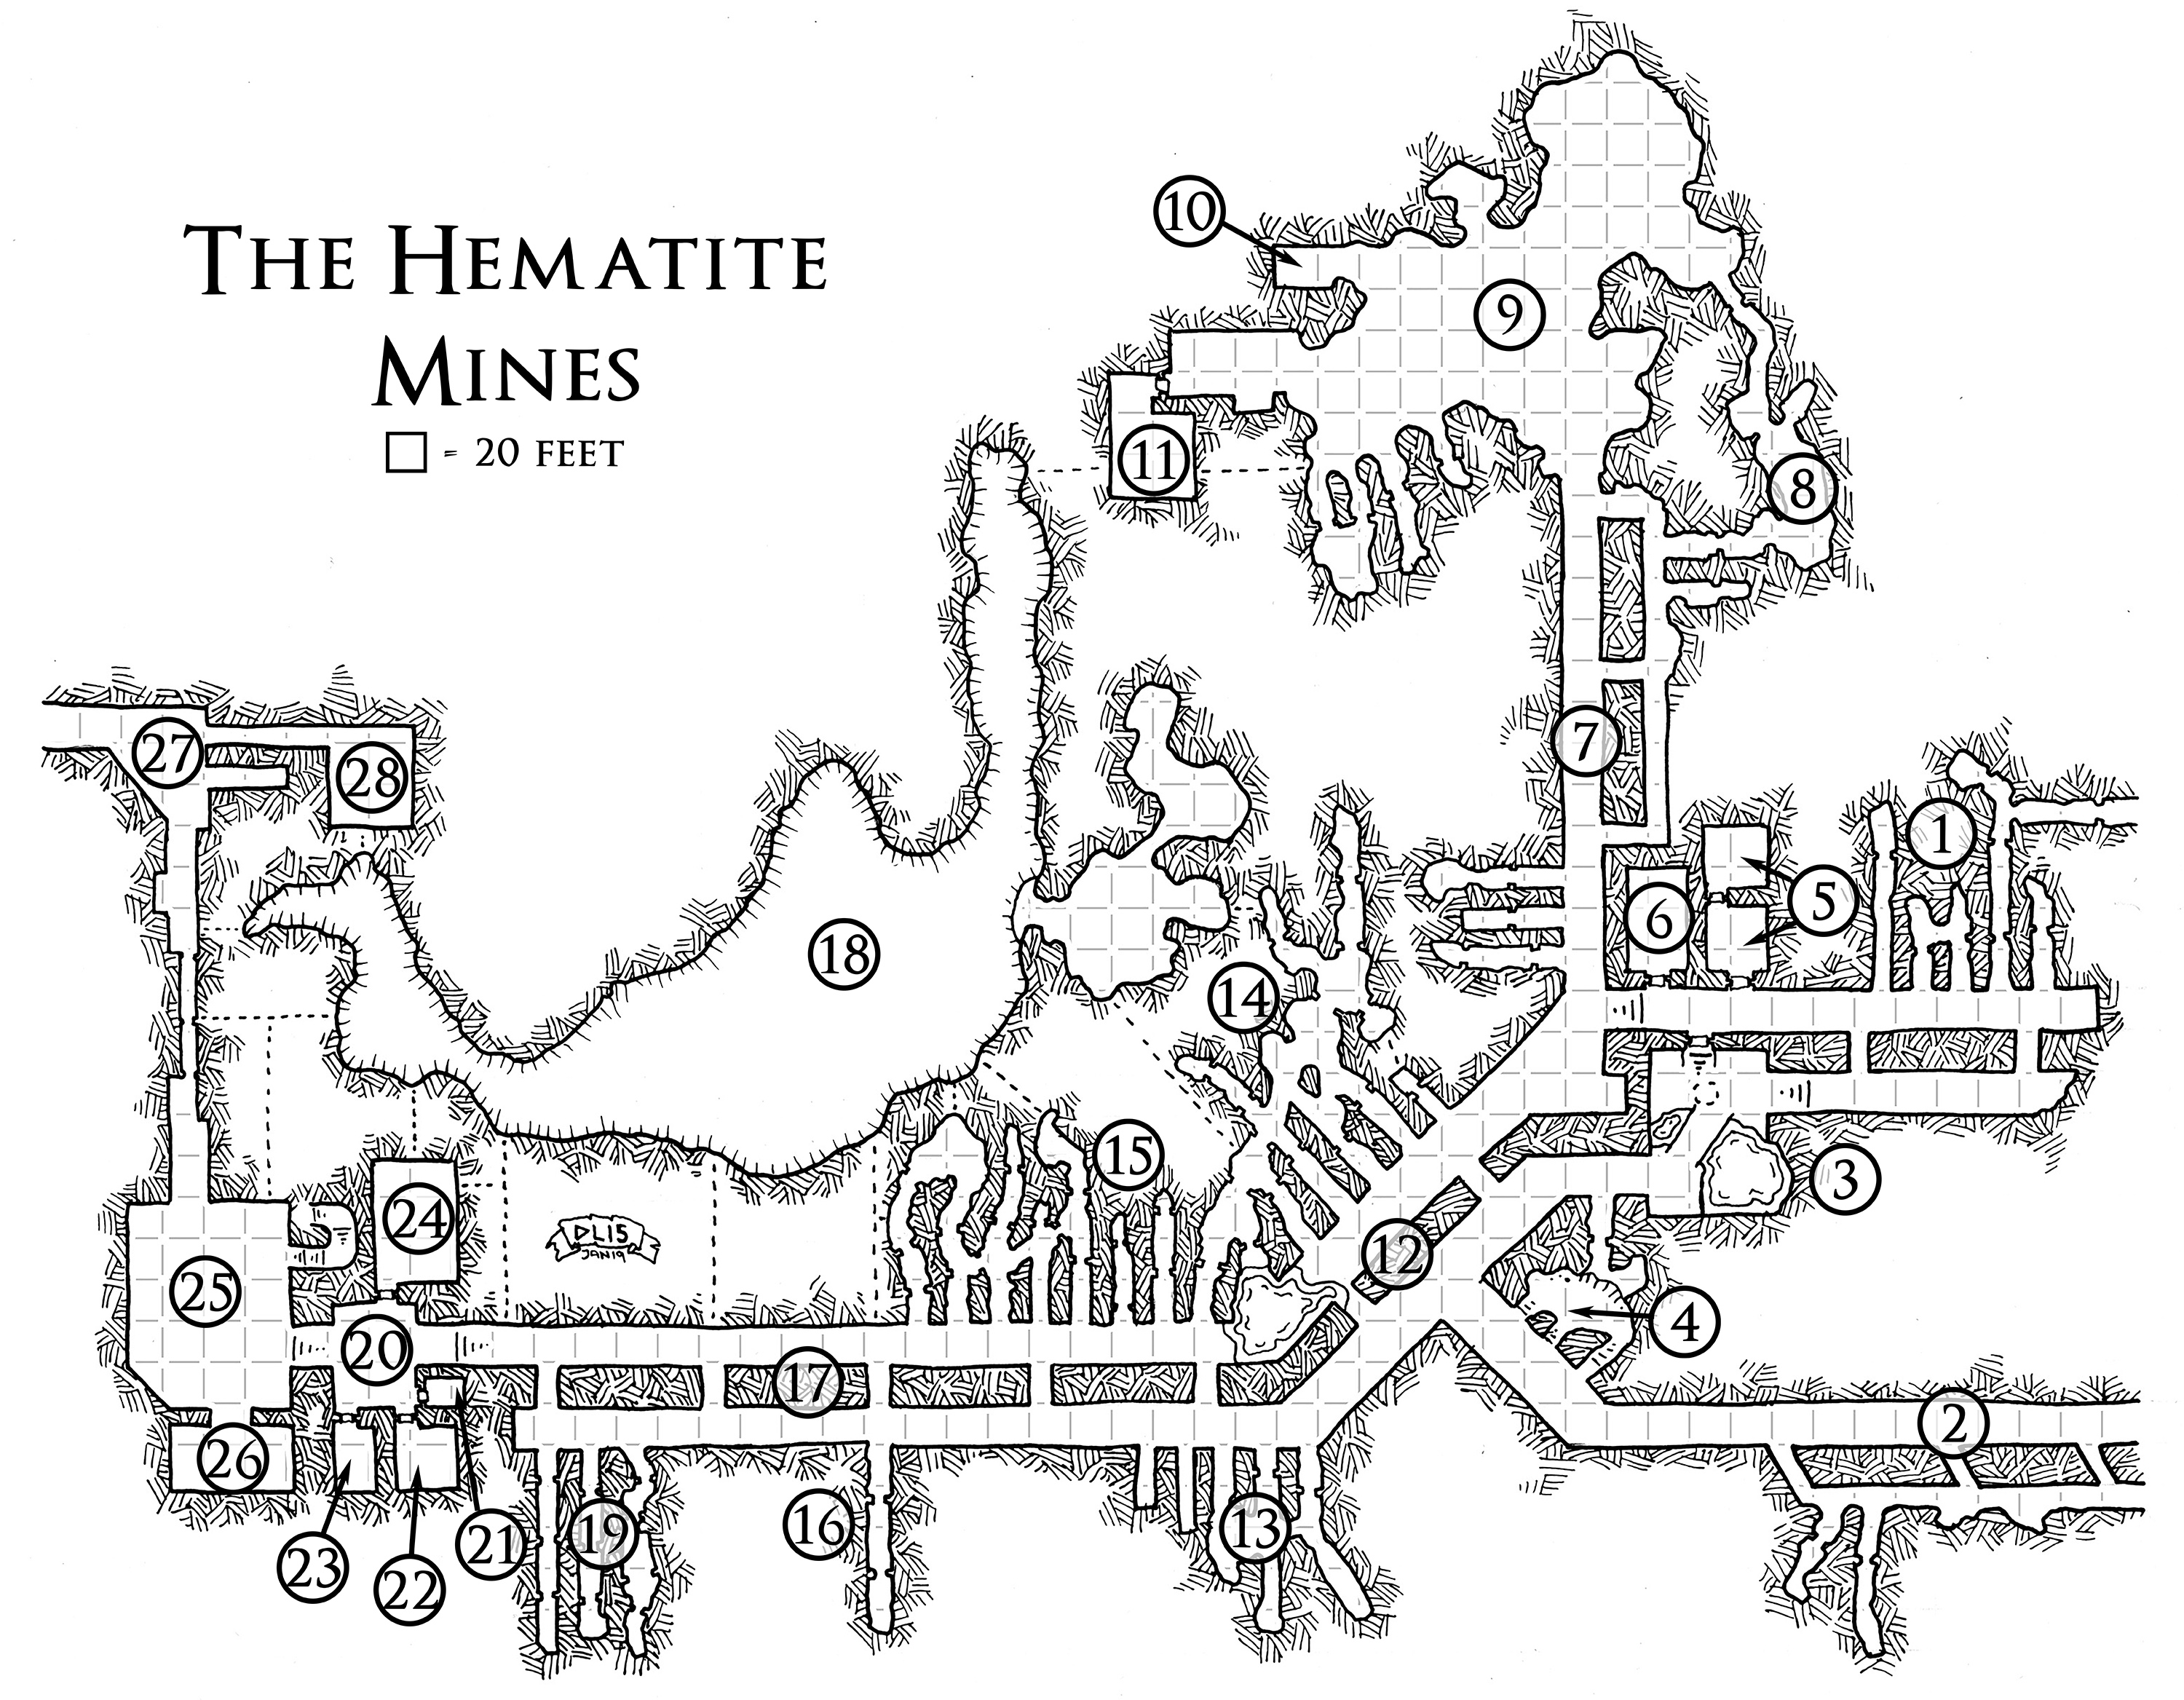
The Hematite Mines
To the west of the Dwarven Outpost and Giants Citadel is a colossal maze of mines filled with valuable ore known as hematite. Here’s Dyson’s description of the Hematite Mines:
Beneath the Venomous Hall lie the Hematite Mines – source iron ore for the dwarves who helped to equip armies to fight in the war against the elves. Also known as the East Mines, these passages link to Venomous Hall via the stairs at the lower left, to the West Mines on the left and to both the Giant Citadel and the secret dwarven camp to the right. Finally, a small 6 to 8 foot wide natural chimney descends from the lowest point in the Mushroom Cavern to the sump room in the lower right side of the map (indicated by a small dashed circle).
This map is drawn at a larger scale than most of the recent maps – 1 square is 20 feet, like the maps of the Lost River Cave or the Mushroom Cavern. The dotted lines that lead to the deep crevasse (the same crevasse from the Marble Hall and the Venomous Hall) are small airways that were added to provide fresh air to the dwarves working down here. Now that the crevasse is home to the malevolent Gimchak Spiders, they use the airways to send scouts into the mines – watching to be sure that they will not be disturbed by the return of dwarven industry, or at least that they will be warned before it becomes so prevalent that it affects their society.
Kruthik for Gimchak
Certainly, the Gimchak Spiders sound cool. But having recently purchased acopy of Mordenkainen’s Tome of Foes, I felt that the kruthik were more appropriate. The book mentions that kruthik are drawn to fires, especially those of dwarven forges. Perfect. Plus, they’re very intelligent and have their own language. Tactically, they’re tough as hell, too. They’ve got super high AC, pack tactics that give them advantage on attacks when a fellow kruthik is near, and have fucking swords for arms.
I imagined the kruthik incursion as a cross between xenomorphs from Alien with a little Predator thrown in. They can see heat.
What’s also cool about kruthik is that they pay no mind to constructs, elementals, oozes, and undead. Basically, the stuff they can’t eat. That means I don’t have to fill a dungeon with just a bunch of bugs.
Following Dyson’s notes for the rest of the delve, I put the as-yet-unseen kruthik hive lord in the Venomous Halls above the mines along with its eggs and young.
Labeling the Map
Kruthik. That’s pretty much all I needed to know going into this. Well, that, and the place used to be a mine. So I had damn near full carte blanche with this bad boy.
Here’s how I labeled everything, starting with the PCs’ likely entrances to the west from the Dwarven Outpost, then numbering everything “following the left wall” like they tend to do.

The Areas from Dyson’s Notes
Dyson didn’t really give too much direction here. We know that area 3 is a sump room with a natural chimney in the ceiling leading up to the mushroom cavern. I’ll have fun with that, because the PC’s have been trying to get up to the surface for a while. The crevasse at area 18 is home to the kruthik (as are the large rooms in the Venomous Halls which I’ll detail later). The young use the airways (those dotted lines) to scout ahead.
Duergar Offices
There are two clusters of square rooms that strike me as offices. The first cluster is right by the north-eastern entrance into the mines, areas 5 and 6. This is where the big, nasty jerk-face from the duergar city, Pit Boss Hoo’uk and his posse made their home. They were the group in charge of the massive natural cavern in areas 7-10. On the other side (areas 20-28) were the main barracks for the entire mining operation. Here’s where an unusual group of adventurers are hiding out, recovering from a close encounter with the Brotherhood in the Thunder Mine next door.
Massive Cavern
Area 9 is massive. It won’t even fit on my 36″ x 48″ Chessex battle mat. This natural cavern was a gimme for duergar, specifically Hoo’uk and his cronies. Here is where Hoo’uk employed his biggest, meanest machines: hammerers, screamers, and a bucket wheel excavator powered by a behir named Romana. After the kruthik incursion, Romana escaped and now roams the mines seeking revenge on any duergar and kruthik that get in her path.
Udrin’s Laboratory
The maniac behind Hoo’uk’s labor was Udrin, a golem creator. Udrin’s the one that created the hammerers, screamers, and even the bucket wheel excavator. Udrin’s lab is tucked into area 11. Seeing value in Udrin’s creations, the kruthik hive lord decided to keep the weasely duergar mage alive. So long as Udrin continued to make constructs for the kruthik that is. Now, she creates flesh golems from the discarded corpses of those the kruthik refuse to eat. These golems serve and protect the hive.
Blop Monster’s Pool
At a low point in the tunnels is a large pool (area 12). Here is where my son, Jack’s creation, the blop monster finally makes its debut. Jack’s been begging me to add in the blop monster ever since he created it and now I finally have a chance to here.
Here’s the stats for the infamous blop monster (illustration coming soon):
Blop Monster
Huge ooze, unaligned
AC 6
Hit Points 105 (10d12 + 50)
Speed 20 ft., Swim 20 ft.
Abilities Str 21 (+5), Dex 4 (-4), Con 20 (+5), Int 1 (-5), Wis 6 (-2), Cha 1 (-5)
Stealth +0
Damage Vulnerability fire
Damage Immunities acid, lightning, slashing
Condition Immunities blinded, charmed, deafened, exhaustion, frightened, prone
Senses blindsight 60 ft. (blind beyond this radius), passive perception 8
Languages —
Challenge 7 (2,900 XP)
Amorphous. The ooze can move through a space as narrow as 1 inch wide without squeezing.
Water Camouflage. The blop monster has advantage on Dexterity (stealth) checks made to hide in water terrain.
Highly flammable. If the blop monster takes fire damage, its surface ignites. Until the blop monster takes an action to douse the fire or it moves into water, it takes 10 (2d10) fire damage. A creature that touches the blop monster is on fire or hits it with a melee attack while within 5 feet of it takes 10 (2d10) fire damage. In addition, the flaming blop monster can enter a hostile creature’s space and stop there. The first time it enters a creature’s space on a turn, that creature takes 10 (2d10) fire damage and catches fire; until someone takes an action to douse the fire, the creature takes 10 (2d10) fire damage at the start of each of its turns. While on fire, the blop monster sheds bright light in a 45-foot radius and dim light in an additional 45 feet. And also while on fire, the blop monster’s attack deals 12 (2d6 + 5) bludgeoning damage plus an extra 27 (6d8) fire damage. If the target is a creature or a flammable object, it ignites. Until a creature takes an action to douse the fire, the target takes 10 (2d10) fire damage at the start of each of its turns.
Actions
Pseudopod. Melee Weapon Attack: +8, reach 10 ft., one target. Hit: 12 (2d6 + 5) bludgeoning damage, plus 18 (4d8) poison damage, or 12 (2d6 + 5) bludgeoning damage, plus 27 (6d8) fire damage if the blop monster is on fire. Also, while the blop monster is on fire, if the target is a creature or a flammable object, it ignites. Until a creature takes an action to douse the fire, the target takes 10 (2d10) fire damage at the start of each of its turns.
Random Encounters
Because there’s so many little tunnels and shafts throughout the Hematite Mines, a majority of it is left without details. Instead, I thought it’d be more fun to have all sorts of strange, exciting random encounters. Since kruthik avoid inedible monster types, these tunnels are probably littered with oozes, undead, elementals, and even the odd construct left over from the duergar mining operation.
Oh, and let’s not forget that Romana is still wandering around causing a ruckus!
When the PC’s enter a new tunnel or shaft or an hour has passed, roll for a random encounter. On a roll of 18-20 a random encounter occurs.
I’ve included a random encounter chart which you can access by clicking the link below:
Random Encounters for the Hematite Mines
The Hematite Mine Basics
The Hematite Mines are a series of abandoned mines. They were originally dug by the dwarves who lived in the city above. Later, the duergar of Vonstag laid claim to them and continued the operation.
- Ceilings. Most of the mines have 10-foot high ceilings and are made of solid rock along with the walls and floors. Only in the longer passages do the ceilings reach 15-feet.
- Doors. Doors here are made from stone slabs balanced on central pivots that create openings about 3 feet wide.
- Ventilation tunnels. The dotted lines on the map are ventiliation tunnels leading to the chasm in area 18. Most of these tunnels are about 2.5 feet wide and will require a DC 12 Strength (Athletics) check to climb through them. They are also obscured with the magical fog from the chasm.
- Heat. Any sort of heat created in this area might alert the kruthik to the presence of source’s creator, especially fireballs and flame-based spells. Even a torch can send the foul reptiles charging (or borrowing!) in that direction. Use the following chart to see whether or not kruthik show up:
- Torches or similar small-sized fire. 25% chance that 1d6+1 adult kruthik (Mordenkainen’s Tome of Foes, p 212) show up.
- Campfire or similar medium-sized fire. 50% chance that 2d6+2 adult kruthik show up.
- Fireball or similar large-sized fire. 4d6+4 adult kruthik automatically show up.
- Illumination. The mines are completely dark. All of the lanterns have been smashed and torches doused to avoid drawing the kruthik.
Area Descriptions
Now that I had the ideas laid out for each of the areas, here’s how the individual areas shaped up:
1 – Northeastern Entrance
This is the entrance leading from the Dwarven Outpost. If the PC’s triggered the trap in area 25 of the Dwarven Outpost, there’s no way back.
2 – Southeastern Entrance
If the tunnel collapsed in the Dwarven Outpost area 25, this is the only way back to Vonstag, through the Giant’s Citadel.
- Two galeb duhr (Monster Manual, p139) protect the entrance into the Giant’s Citadel. They’ve been instructed to kill anything that comes within 60 feet of the citadel.
3 – Sump Room
Water from the mine as well as the 200-foot high natural chimney drains into this room. It pools here and is covered with a thick layer of algae.
- The dull glow of the phosphorescent mushrooms from above can be seen by anyone looking up into the chimney
- It is 25 feet from the floor to the hole in the ceiling.
- Climbing up the chimney takes a DC 20 Strength (athletics) check for every round spent climbing. Additionally, there is a swarm of centipedes (Monster Manual, p338) who live in the center of the tunnel and will attack anyone that comes through.
- The water below the bridge of the sump room is 15-feet deep at its deepest point.
4 – Bloodstone Pit
The duergar discovered a vein of bloodstone here.
- If the PCs are patient and spend at least an hour digging, there’s a 10% chance per each digging character that they will find bloodstone worth 50gp. PCs can dig without penalty for a number of hours equal to their Constitution modifier. For each hour spent digging past that, a character must make a Constitution saving throw at the end of the hour. The DC is 10 + 1 for each hour spent digging. On a failed saving throw, a character suffers one level of exhaustion.
5 – Hoo’uk’s Office and Chambers
Before the evacuation, this is where Hoo’uk lived and worked. The body of a dead slave is here, chained to the wall. Hoo’uk left her here to die.
- The door to Hoo’uk’s office is locked. It requires a DC 20 lockpicking check to open.
- In the slave’s hand is a scrap of fabric with an embroidered image of the slave and her daughter. And in her other hand is a gold pen worth 25gp. She used this to take her own life.
- In Hoo’uk’s chambers, he painted a map of the dwarven city above the mines on the ceiling. The paint he used is invisible to darkvision (he made it from the blood of the nightmare stalkers). It gives a rough layout of the city plus shows how to potentially get out through the harpy tower.
6 – Nerzgo Barracks
The deep dwarves who lived in these barracks tried to fight off the kruthik. However, the doors were ripped away and the duergar were killed, drug off and eaten. Everything is in disarray. There is a bucket of water with extinguished torches.
- A DC 20 Intelligence (Investigation) check reveals a small, locked chest (DC 15 to open) with 48sp and 13gp.
7 – Nerzgo Stretch
This north-south tunnel at the eastern edge of the Hematite Mines connects the Rumble to the huge cavern in area 9.
- Mid-way between the bend and Nerzgo Cavern, a kruthik young (Mordenkainen’s Tome of Foes, p211) feeds on a dead darkmantle. It will immediately screech and chitter for others to come (2d6 + 2 adult kruthik show up to wherever the young was in 3 rounds) unless the PC’s silence it first.
8 – Hematite Veins
There are rich deposits of hematite here.
- A flesh golem (Monster Manual, p167) made of stitched together duergar lurks in this tunnel.
- If the PCs are patient and spend at least an hour digging, there’s a 25% chance per each digging character that they will find hematite worth 10gp. PCs can dig without penalty for a number of hours equal to their Constitution modifier. For each hour spent digging past that, a character must make a Constitution saving throw at the end of the hour. The DC is 10 + 1 for each hour spent digging. On a failed saving throw, a character suffers one level of exhaustion.
9 – Nerzgo Cavern
This gargantuan cavern was a major part of Hoo’uk’s mining operation. Before the kruthik incursion occurred, the walls were stripped for hematite and bloodstone. A massive machine called a bucket wheel excavator takes up much of the center of the cavern. Baskets full of spilled hematite lie everywhere, left behind when the kruthik came in.
- There are two flesh golems and six kruthik adults that guard this cavern. Additionally, there are five duergar hammerers (Mordenkainen’s Tome of Foes, p188) and two duergar screamers (Mordenkainen’s Tome of Foes, p190) spread throughout that continue to work despite the duergar having abandoned them. These particular duergar are mostly mindless, and will avoid confrontation with the PC’s. However, the golems and kruthik will attack the PC’s on site and potentially call for more.
- The bucket wheel excavator no longer works as its power source, Romana the behir is no longer powering it. However, its driver is still wired inside, barely alive. He will beg the PC’s to kill him.
- There is probably a small fortune worth of hematite in this mine. Enough to make the PC’s very rich for a very long time as long as they can escape with it all and sell it.
10 – Slave Pens
Iron bars were erected here to hold in roughly 25 slaves. When the kruthik invaded, the duergar left them behind. Some were dragged off by the kruthik, while others were used as parts of Udrin’s golems.
11 – Udrin’s Lab
At the behest of the Hive Lord, Udrin (LE female duergar mage – Monster Manual, p347) works here to create flesh golems for the kruthik. Her lab is the stereotypical mad scientist lab, with vials, glass jars, prodes and electrodes. There are two flesh golems in the room. One stands in the corner while the other is being worked on upon a large stone slab in the center of the room.
- Udrin will not attack the PC’s nor will her golems. Udrin hates the kruthik and wishes to escape. She will ask the PC’s to help her out of the tunnels with the promise of a reward, a map of the dwarven city above along with the exit out through the harpy tower. She knows where Hoo’uk kept it hidden in his chambers.
- If the PC’s attack Udrin, she will defend herself with her spells and flesh golems and call for the kruthik, potentially going as far to start a fire to draw them.
- The chemicals in Udrin’s lab are highly volatile. If there is a fire of any sort (from a fire ball, flame sphere, etc.) there is a 25% chance it creates an explosion. Anyone in area 11 when this happens must make a DC 12 Dex save or take 8d8 fire damage and be knocked prone, or half and not knocked prone on a successful save.
- A successful search through the room reveals 70 gold pieces in a small bag along with some rations, 100-feet of rope, and a jeweled dagger worth 25gp.
12 – Upper Rumble
This section of the Hematite Mines is known as the Rumble because of a strange quaking that occurs a few times per day. The cause of the rumble is a tiny pocket of the Elemental Plane of Earth hidden behind the stone walls. At the bend between the Nerzgo Stretch and the Rumble is a pool of stagnant water.
- In the pool hides a blop monster (see above). Knowing water sources to be limited in the mines, it waits patiently for living creatures to come close to the water so it can attack them.
- The pool is 5-feet deep at its deepest point and counts as difficult terrain.
- If the PC’s drink the water without first purifying it, they must make a DC 12 Con save or become poisoned for 1 hour.
13 – Hematite Veins
These tunnels here are rich with hematite.
- If the PCs are patient and spend at least an hour digging, there’s a 25% chance per each digging character that they will find hematite worth 10gp. PCs can dig without penalty for a number of hours equal to their Constitution modifier. For each hour spent digging past that, a character must make a Constitution saving throw at the end of the hour. The DC is 10 + 1 for each hour spent digging. On a failed saving throw, a character suffers one level of exhaustion.
14 – Romana is Trapped
Unless the PC’s have already encountered her randomly, Romana the behir is in the middle of a battle with a horde of kruthik. Ever since the duergar fled the caverns, she’s been stalking the tunnels fighting the kruthik. The kruthik have done their best to avoid her, but often to no avail. However, a group of clever kruthik trapped her and are trying to take her out at behest of the hive lord.
- Seven adult kruthik have trapped Romana, a behir (Monster Manual, p25). When the PC’s find her she is at half her hit points (84 for a max of 168) and has already spent her lightning breath.
- The adult kruthik are too focused on Romana to attack PC’s, so the PC’s may be able to get the drop on them.
- If the PC’s save Romana, she will not attack back, realizing that she is too weak to battle them. Instead, she will try to crawl back to her lair in area 18 to recover and get revenge.
- If any of the PC’s are able to communicate with Romana (she speaks Draconic), she will repeatedly mention that the kruthik ate her young and she wants revenge against them all.
- Romana is not very intelligent, so learning things from her can be difficult. However, she suspects that the unseen alpha of the kruthik makes its home in the old dwarven city above the mines. She suspects that it protects a great treasure.
- The ventilation hole leading to the ledge in area 18 is wide enough for Romana to squeeze through (roughly 5 feet wide). She’s been using it to return to her home there. It emerges 50 feet above her ledge as a sheer drop. Fog from the cavern obscures both Romana’s ledge and half of the tunnel. Anyone traveling through it does so as if under the effect of the fog cloud spell. If someone reaches the end of the hole and fails to notice the drop (DC 15 passive Perception check), they must make a DC 10 Dexterity saving throw or fall and take 5d6 damage and become prone.
- Romana is temperamental and will turn on the PC’s quickly if they irritate her or engage her. If she sees a duergar, she will immediately attack it, blaming them for her misfortunes.
15 – The First Attack
This is where the duergar first came across the kruthik who emerged from the ventilation holes leading to 18.
16 – Collapsed Entrance
When Hoo’uk and his cronies escaped, this was the exit they took back to Vonstag. His men sabotaged the way back, collapsing the tunnels, leaving hundreds of duergar behind.
17 – The Rumble
This is the main passageway through the Hematite Mines. Because it is so well-traveled, there is an increased chance (17-20) of a random encounter here. Also, once per hour, the entire hallway rumbles from the tiny portal from the Elemental Plane of Earth hidden in the walls.
18 – The Chasm and Romana’s Ledge
The chasm that cuts through the middle of the mine and borders the great, dwarven city above the mines is obscured in a magical blanket of fog. No wind or fire can remove it. The fog is part of the old defense systems of the nautiloid that lies 300 feet at the bottom of the chasm. Romana makes her home on the ledge to the east side of the chasm. The kruthik won’t dare to go into Romana’s home.
- If the PC’s have already met Romana in area 14 and she is still alive, there is a 25% chance that she can be found here.
- The fog that obscures the chasm also obscures Romana’s ledge. It has the same effects as a fog cloud spell. She’s grown accustomed to it and suffers no disadvantage from its effects while in her lair.
- PC’s that come close to the edge and fail to notice it (DC 15 passive Perception check) must make a DC 10 Dexterity save or fall 300 feet to the ground below. They suffer 20d6 damage and find themselves at the bottom of a chasm among the wrecked nautiloid.
- Note: I haven’t mapped the nautiloid yet (nor is it part of Dyson’s map), so try to discourage your PC’s from, uh… jumping off the edge.
- Romana has no interest in valuables herself. However, over the years, she’s eaten a few adventurers who hoped to kill her including one sharply dressed dwarf. She swallows her prey whole, but is known to pass valuables she’s unable to digest. If the PC’s take long enough to search the area at DC 20 Intelligence (Investigation) check thanks to the fog, they will find the following items:
- adamantine chainmail armor
- well-crafted greataxe worth 300gp
- 130gp
19 – Hematite Veins
These tunnels here are rich with hematite.
- If the PCs are patient and spend at least an hour digging, there’s a 25% chance per each digging character that they will find hematite worth 10gp. PCs can dig without penalty for a number of hours equal to their Constitution modifier. For each hour spent digging past that, a character must make a Constitution saving throw at the end of the hour. The DC is 10 + 1 for each hour spent digging. On a failed saving throw, a character suffers one level of exhaustion.
20 – Rumble Head
Rumble Head was where most of the duergar miners congregated when not working. There is a collapsed statue of Deep Duera here, knocked over by the kruthik during the initial incursion.
- Gomp, Geridian’s shield guardian (Monster Manual, p271) stands watch here. Unfortunately for his companions, Gomp has already used the spell that stored was in him to save Gloopo and Geridian from the brotherhood in the Flooded Mines.
- Gomp will prevent any creature from entering area 23. If attacked, Geridian and Gloopo (see area 23) will rush to Gomp’s aid. Geridian will try to calm anyone down, especially if they appear to be normally non-hostile.
21 – Tool closet
The duergar stored their tools here.
22 – Hammerer Station
Hammerers waited here for orders from Udrin and the pitbosses. Most of the hammerers still wander the halls, but there are still two in here.
- The two duergar hammerers are inactive and will only fight to defend themselves.
23 – Pit Boss Blugget’s Chambers
The rumble pit boss, Blugget lived here. Blugget died trying to escape along with Hoo’uk and his men. Now, Geridian and his companion Gloopo rest here before continuing east through the mines.
- Geridian (NG male human archer – Volo’s Guide to Monsters, p210) is blind. He cut out his own eyes so he could continue to be with his love Mazratha, a medusa. However, Geridian has learned to cope with his blindness. He still automatically fails ability checks that require site. However, creatures do not have the normal advantage against him for being blind, nor does his attack rolls have disadvantage.
- Gloopo (N male bullywug – Monster Manual, p35) is Geridian’s faithful companion. The two met while Geridian and Gomp were traveling through the Lost River. Gloopo is on a quest from the King of his people–whose name is also Gloopo–to find an item of great power and bring it back to King Gloopo. He can’t just be given this item, he must find it himself and battle something more powerful than he. Meanwhile, Gloopo is also supposed to create art on the walls that tell of his adventures.
- Gomp, Geridian’s shield guardian, stands guard outside. Geridian wears an amulet which gives him power over Gomp.
- Geridian, Gloop, and Gomp are on a quest to find Geridian’s true love, Mazratha who was captured by a raiding party of stone giant worshiping gnolls. Clues led Geridian through the necropolis to the far east, down the lost river, and now through the mines. However, he was injured fighting the Brotherhood in the Flooded Mines and is resting before he continues.
- It’s nearly impossible to persuade Geridian to go anywhere but towards the Giant’s Citadel. He will help as much as he can, but is driven by his love for Mazratha.
- If asked about the areas he’s been through, Geridian can share the following information:
- A gaggle of mephits has taken over the barracks in area 24. They’re mostly harmless, but hopelessly obnoxious.
- The mines to the west are where strange, pale, bald nearly identical men live and work. For whatever reason, the kruthik won’t bother them. Geridian has nicknamed them the Brotherhood.
- To the north of the western mines are another set of mines that have been flooded. The waters are infested with thousands of monsters with sharp teeth. Geridian advises to avoid entering the water at all costs. He also believes that some sort of psychic beast of great power makes its lair somewhere in there.
- Gloopo’s home is west of the mines along the lost river. His people are mostly peaceful, although he suspects that their King, King Gloopo, takes advantage of the amphibian races there sending them out to find treasure on his behalf.
- The easiest way out to the surface is through the old, empty crypts and necropolis. While he ran into a little trouble there, it was mostly devoid of supernatural evils. However, he did narrowly avoid a long, thin black dragon crawling through the crypts there.
- Outside of the necropolis is a small hamlet located just at the edge of the mountains.
24 – Rumble Barracks
These were the mines main barracks and have nearly 100 beds here. Now, a gaggle of wandering mephits tear the place apart looking for trinkets.
- There are eight mud mephits, two smoke mephits, and a steam mephit who is the leader (Monster Manual, p215).
- The mephits are cowards, but that won’t stop them from being dickheads to the PC’s.
- One of the mud mephits carries a bag of trinkets found among the duergar’s old goods. It’s mostly junk, but PC’s can find 240sp and 100gp in the bag as well along with a mystery key (Xanathar’s Guide to Everything, p138) and an orb of time (Xanathar’s Guide to Everything, p138).
25 – Deposits and Steeder Pens
The duergar used to bring their deposits here to attach to steeders to send back to Vonstag. The pens were torn open by the kruthik. Some of the steeders escaped, while many were killed. Some of their carcasses remain.
- 700gp worth of hematite can be collected from the floors here.
26 – Refinery
The raw hematite was brought here to be refined.
- The PC’s can find 500gp worth of hematite here as well as 800gp worth of bloodstone.
27 – Rukrok’s Bend
A flesh golem, torn in two by Gomp (area 23), lies here. The tunnel west leads to the Thunder Mines.
28 – New Chamber
The duergar were carving out a new chamber here before the incursion occurred.
And that’s it!
That about covers it for the Dyson Mega-Delve’s Hematite Mines. I might tackle the Venomous Halls or the Thunder Mine next, but I have a strong feeling that the PC’s won’t make it out of the Hematite Mines that quickly. So I may continue after our session on Saturday.
Anyway, thanks for reading! And as always, feel free to use this content in your own Dungeons and Dragons 5e campaign! Just not commercially.
See you later!
nice job waiting for the next area 😀