
Recently, one of my patrons, Travis, contacted me about making a first tier vampire adventure for his PCs.
Here are the notes from our correspondence:
… I guess next thing I would ask of you when ever you get a chance is a vampire lair or a cult lair. I’m thinking count strahd esc and his lady. They want to make the girl their… ‘daughter’ for ever. The cult will want to summon demons or some such from an old forgotten good [sic] to rid the new land of the savages. Maybe a further quest like level 8-9? I’m not super sure on how I’m running this yet, it’s all sort of fly by the seat of my pants.
I would love some sort of trap ladden dungeon or a good tough puzzle room.
Well hags are a just an obstacle maybe a if this campaign goes long, a BBEG. A vampire couple will be the BBEG likely wanting to create a trade Monopoly.
All of this sounds pretty excellent. Following sort of the rules I’ve laid out a few times when building a dungeon, I’ll help Travis build this out using my rules for building dungeons.
Then, I’ll take those details and flesh them out. Should be fun!
Adventure Structure Notes
Here are my notes for this adventure. I’ve used Travis’ notes along with the random dungeon tables found in the DMG p72.
- This adventure is a location-based adventure, specifically a dungeon.
- The goal of the dungeon is (14) escape from captivity in the dungeon. Note: Travis may have different ideas, but this is for any others who want to use it and don’t have a good hook leading in.
- The adventure villain is a (17) humanoid raider or ravager. I’ll replace humanoid with vampire spawn to fit the tone.
- The ally of the adventure is a (5) priest. Fitting, since it’s a vampire story.
- The adventure’s patron is a (7) temple official. Makes sense!
- I used donjon’s map generator to flesh out the details. I set it up so that it’s a round area–a collapsed tower–that the vampire and its minions have been holding out in. It’s been capturing locals (including the PCs) and keeping them hostage, allowing its progeny–a malicious vampire spawn–to feed in peace. You can see the map below.
- The adventure introduction comes when (8) the temple official sends the PCs to the adventure location to track down a missing priest.
- The adventure’s climax (9) happens when the lair begins to collapse while the adventurers face the main villain (the vampire spawn), who attempts to escape in the chaos.
- Plan encounters: read my notes below for the encounter.
Planning Encounters
Since Travis’ characters are all around level 3, I’ll budget accordingly. According to the Adventuring Day XP table on page 84 of the DMG, 3rd level characters can handle 1,200 experience each every day. Multiplied by 4, and that’s 4,800 for the entire party. This equals 6 Medium to Hard encounters before the PCs will need a long rest.
First up, we know we want the vampire spawn to be the main villain. At CR 5 (1,800 XP), that’s going to eat up a ton of the budget. Travis also wanted a bunch of traps, too. I’m seeing this whole place as being sort of a rickety joint that’s close to falling apart. The vampire knows all its weak spots and uses the terrain to its advantage. The big goal of this place is to get the priest out of there.
Anyways, I’m going to add in four traps. 3rd level traps are worth 650 experience each. That will take up another 2,600 experience out of our budget. This leaves us with only 400 experience, which is essentially one Easy to Medium encounter.
Being undead, I think some filthy rat swarms might be cool and go with the rest of the dungeon’s vibe. Rat swarms are worth 50 XP each. If I throw four of them at the PC’s at one time, the encounter multiplier will bump them up to 100 each, for a grand total of 400 XP.
Here are the encounters I’m seeing:
- The vampire spawn that lurks in the collapsed tower.
- Four swarms of rats (disease carrying, of course) rooting around in the filth.
- A trap that pins a large piece of rubble on one of the PC’s, putting them face first in a puddle of water. A Dex save followed by Strength checks to free the trapped PC.
- Another trap where the ceiling collapses. A Dex save.
- Fungi. Lots of fungi. This will be a Constitution saving throw.
- A magical ward by the BBEG to keep creatures (and the vampire spawn) from leaving the tower. This will be a Wisdom save.
Keying up the Adventure
Now that I know what I want to stock my dungeon with, it’s simply a matter of keying it all to the map.
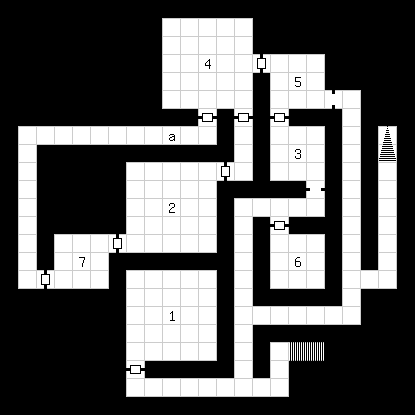
A few notes about the map above. Just because it looks nice and neat doesn’t mean it is. I see this as being a mostly ruined tower in the middle of a swamp. Part of it is sinking, too, and almost the entire things’ ceiling is collapsed. In the old rooms that still had functioning windows, the room’s filled with water (#7 for sure). The stairway that leads down (in the top right corner) is crumbled, the old dungeon below destroyed. The only way out is through the stairways leading up to the surface at the bottom right corner.
Area #2 is where the vampire spawn’s prisoners (aka food) is stored. The vampire spawn itself hangs out in area #1. The rats act as “guards” in area #4, keeping creatures from leaving that way. The door is barred, too, making it difficult to escape. Meanwhile, there’s a way to crawl out going through the submerged area #7 and crawling down the tunnel (where the pillar trap is).
Area #6 is where the possessions of captives are held, those of the PCs (if you choose to use the captive scenario) and the priest, as well as some other treasure. Area #3 is loaded with fungi that does necrotic damage. The halls on the western end are too ruined to traverse easily (only Small or smaller creatures can get through and even then needs to make checks to get through it).
Now that I’ve got all these ideas out, it’s simply a matter of “putting it to paper”, so-to-speak.
Running the Adventure
The adventure, which is designed for a group of four or five 3rd-level player characters, gets underway when the characters are contacted by a local temple official, George Archer (LE male human priest). They can already be familiar with George or have met him in a public place such as a tavern or inn. When they finally meet George, read the following:
The old priest’s expression already tells you there’s trouble. “Three nights ago, one of my young acolytes, Drobert was kidnapped by a creature of pure evil: a vampire. While we know this particular vampire lives somewhere in the southern forest, Drobert was seen being pulled towards the swamp, just six miles to the south of here. My colleagues and I believe that the vampire has a secondary home there where it keeps one of its progeny. It’s likely it’s brought Drobert there as…” he swallows hard, frowning. “… food.”
George doesn’t have a lot to offer the characters other than a warm place to stay and a few good meals. He hopes that their good natures will lead them to rescue Drobert.
In reality, George is actually a human pawn of the vampire himself. While he does care for Drobert, Drobert found a clue revealing George’s true intentions. Not wanting to get caught (which would greatly anger his undead master), the old man clobbered Drobert over the head with a candelabra and telepathically contacted his master to dispose of Drobert. To throw the other villagers off his scent, he’s brought on the adventurers hoping that his master can easily dispose of them, too.
Should the PC’s stay the night, George will slip poison into the PC’s food and water, incapacitating them. From there, he’ll recruit more of the vampire’s thugs to drag them to the vampire spawn’s lair.
The Vampire Spawn’s “Pantry”
When the characters awake, read the following (as long as they can see):
Your head is pounding. Looking around, you can see that you’re no longer at the temple. Instead, you’re in a damp, dark room with stone walls. The smell of mold fills your nostrils. A young man wearing priests’ vestments is curled up against the wall. His face is pale and he appears to be sick. Where are you?
The priest, of course, is Drobert. He’s been held captive by the vampire spawn for three days now and Frona, the vampire spawn has been feeding on him regularly. He will explain the situation to the characters.
The Lair of the Vampire Spawn: General Features
The walls inside the ruins are constructed of ancient stone. There was once mortar between the large blocks, but much of it has crumbled away, allowing mold to push through. Nearly everything is wet to the touch thanks to the swamp’s humid conditions.
Ceilings. Almost all of the ceilings in the tower are uneven and relatively low, usually no more than four or five feet.
Doors. The old doors–if they’re still standing–are made of wooden planks bound by iron supports, held up by rusted hinges.
Light. There is no light to speak of in the lair. Frona can see in the dark, so she sees no need to light it.
Crumbling Stonework. Throughout the entire tower, the passageways and rooms aren’t structurally sound. As a result, some spells might have disastrous effects. A spell like fireball (an explosion) or thunderwave (an area of thunder damage) has a 25 percent change to cause a ceiling collapse within the spell’s area, dealing 11 (2d10) bludgeoning damage to creatures in the area. This collapse might block or bury objects or exits.
Submerged Rooms. Many of the rooms of the old tower are partially submerged in water. Be sure to familiarize yourself with the rules on swimming and holding one’s breath in the DMG and PHB.
Locations in the Lair of the Vampire Spawn
The following locations are identified on the map above.
1. Frona’s Chambers
Frona (the vampire spawn) rests here, eagerly awaiting the return of her master. She’s a bit more savage than most vampire spawn, her turn not taking as well as it should. Indstead of destroying her, her master took pity on her and tucked her away in the old swamp. Her alignment is chaotic evil and she has a Wisdom score of 9.
Frona’s chambers are one of the few rooms in the entire tower that a Medium creature can stand in without ducking. The ceilings are 10 feet high.
If cornered here, Frona will use the ceiling and her spider climb trait to her advantage. She’s reckless, but values her life, and will flee if her hit points drop to half or less unless it’s day time.
2. Frona’s “Pantry”
If the characters are captured, this is where they’re held. All of their weapons, armor, and gear (including spellbooks and components) have been taken away. In George’s haste, he didn’t stop to consider that there might be casters among them with memorized spells.
With them is Drobert (NG male human acolyte). Drobert has only half of his hit points and hit point maximum remaining.
There are two ways to escape this room.
Main door. The first is through the door in the top right corner. However, it is heavily barred from the other side. The door has an AC of 16 and 20 hp. Breaking down the door requires a DC 20 Strength check.
Hole in the wall. The second way to exit the room is through a small hole in the wall in the bottom left corner (marked by a “door” on the map). It’s large enough that a Medium creature can squeeze its way through. It leads to area #7 which is fully 3 feet lower than the area that they are in and fully submerged.
3. Fungus room
Fungus covers every inch of this room. Only Frona can walk through the room without being disturbed thanks to her regeneration and necrotic resistance.
When a character moves through the room, spores kick up from the floor, ceiling, and walls. Every character in the room (or even standing by either of its doors) must make a DC 15 Constitution saving throw, taking 5 (1d10) necrotic damage on a failed saving throw, or half as much damage on a successful one. They must repeat this saving throw every round they remain in the room.
The doors in this room are rotten but functional. Frona usually leaves them open.
4. Rats… why’d it have to be rats?
This room slants down at a sharp angle towards the western half of the room where water fills the room 10 feet from the western wall. The “door” in the lower left part of the room is actually a hole leading into a submerged and crumbling hallway (see area #7a).
Frona’s “guards” are hundreds of diseased rats she’s influenced to guard the door leading into her “pantry.” Unless Frona is present, the four swarms of rats attack any creature that enters the room.
The rats are diseased. On a successful bites attack, a creature must succeed on a DC 10 Constitution saving throw or contract rat disease. Until the disease is cured, the target can’t regain hit points except by magical means, and the target’s hit point maximum decreases by 3 (1d6) every 24 hours. If the target’s hit point maximum drops to 0 as a result of this disease, the target dies.
5. Small room
There is nothing out of the ordinary about this room. However, the hallway leading to the old dungeon to the right is completely collapsed. Only creatures of Small or smaller size can shimmy their way through, necessitating a DC 10 Athletics check to move. Otherwise, they are temporarily stuck and must use their action to make another Athletics check to free themselves at the start of their next turn. The stairs leading down into the old dungeon are totally destroyed and filled with water and muck.
6. Spoils
All of the party’s gear is kept in this room. The door is left unlocked since Frona’s overconfidence makes her think none could get to that point.
In addition to the party’s gear, they find the following items:
- 940 cp, 896 sp, and 110 gp
- A silver ring with inlaid onyx worth 50gp
- 2 potions of heroism
- A full suit of leather armor
- A longbow, a quiver, and 15 arrows
7. Submerged Room
All of area #7 and tunnel #7a are completely submerged. Should the characters drop in from area #2 through the hole, they’ll have to hold their breaths to find their way out. The tunnel leading from area #7 to #4 (marked a) is extremely difficult to navigate, some parts lower than others. For every 10 feet a character swims, they must succeed on a DC 12 Athletics check or become stuck, reducing their movement to 0. A character can use its action on its next turn to make another Athletics check to free his or herself.
Midway through the sunken passage, there is a skeleton crushed under a pillar–another one of Frona’s victims who had tried to escape this way. The pillar is held precariously in place thanks to a golden, jeweled dagger in the skeleton’s belt. A character can free the dagger with a successful DC 10 Strength check. However, any creature within 5 feet of the skeleton must succeed on a DC 12 saving throw (potentially made with disadvantage because it’s underwater) or have the pillar collapse on them. A character crushed by the pillar takes 11 (2d10) bludgeoning damage and has their speed reduced to 0 while they are pinned. The pillar can be lifted with a successful DC 14 Strength check (the character that is trapped makes this check with disadvantage), allowing the character to escape.
Exit
The staircase at the lower right corner of the tower leads up to the swamp above. However, Frona’s master has set a glyph of warding on the northern wall by the stairs to trap any who dare try to escape. Noticing the glyph requires a DC 16 Acana check. Any creature that walks within 5 feet of the glyph without speaking the phrase “the sun sleeps under a blanket of stars” triggers a 3rd-level color spray spell (affecting 55 hit points worth of creatures). In addition, Frona is telepathically notified of an intrusion (or escape).
Enter for a Chance to WIN a FREE Book from DMDave!
If you haven’t heard the word, I’m putting out a book on Kickstarter in April. The book is tentatively titled Evadimus’ Guide to Wandrossa and it contains 300+ pages of new, original content by yours truly. The best part? It’s all requests!
Right now I’m holding a contest on Gleam giving you a chance to win. All you have to do is sign up and follow the instructions. It’s 100% FREE. Plus, if you put in 5 entries or more, you get to add your own requests to the book!
Enter for a chance win a FREE book by DMDave!
Art by Wizards of the Coast.